Diamond |
|
Diamond |
|
| The first jewel to be added to the Hardhats Gem series
is the Diamond. It is a clean, initialized Infrastructure-only installation of VistA
that works under Intersystems Cache. As such, it is distributed as a Cache.dat file.
The following instructions provide guidance on how to setup and integrate the Cache.dat
file into an existing configuration. NOTE: The instructions on this page were developed with Cache v3.1, which dramatically changed the user interface from earlier versions of Cache. (Read the earlier instructions for pre-Cache 3.0 installations). For those who are eternally curious, read how the Diamond is cut. It is presumed that:
To increase the value to all Hardhats, please report errors, ask questions, etc. on the Hardhats mailing list. (Join the Hardhats mailing list if you are not already a subscriber - its free.) Cache Linux shortcut: For those who want to evaluate the Cache red Hat Linux download from Intersystems, you can download a preconfigured .cpf file. The file is named kernel.txt. Rename it to kernel.cpf, once it is downloaded, and place it in the Cache directory where the cache.cpf file is located. You will then need to specify this new kernel.cpf file as the startup configuration for Cache. If you have any doubts about this shortcut, use the steps below, instead, to update your configuration settings. |
||||||||||||||||||||
| Let the Setup and Configuration begin...
As a precaution, be sure to have backed up your Cache installation before proceeding with the following procedure.
IMPORTANT: Make sure Cache is running during the following steps and that the steps are performed on the server's console instead of remotely with a Cache client.
To prepare for a baseline VistA install on Cache, create a database for use by the new namespace KERNEL. (You may opt to use a name other than KERNEL. If you do, see the final instructions for details on how to adjust the Diamond to see the namespace you used.) The following screen shows the outcome of using aWizard that walks you through the creation of a database. (View the Wizard screen show for more details.) After running through the Wizard, the following image shows that we have what we want - a new database.
The next step is to define a Cache Namespace that will be tied to the above Database. Another Wizard can be invoked to create a corresponding Namespace, as shown on the Namespace tab below.
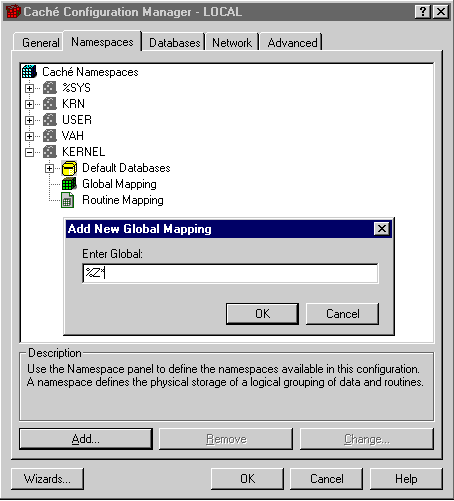
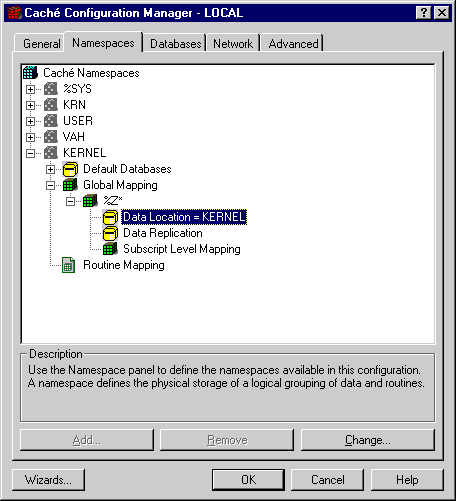
Using the new namespace, create the following routine and global mappings (see images below). Mappings tell Cache where to look for globals and routines that have a specific name or have a specific name prefix. The VistA strategy for Cache, is to map all of the % globals and routines back into the same namespace (UCI) as the production routines. This avoids hassles when installing new versions of Cache that could alter the manager's UCI where % globals and routines typically reside. If you want to have several namespaces (test, production, etc.) think carefully about the idea of sharing % globals and routines by mapping to a common location. After all, should a test account share anything with a live account? [NOTE: The database and the namespace are not required to have the same name.] Defining a global or routine map is same steps, just performed on a different location in the Namespace tree. Right click on Global Mapping or Routine Mapping and select Add. The following dialog window will appear.
By default, Cache chooses the current namespace for the location of the mapped global or routine, as shown below. This is exactly what we want, so there is no need to edit the location.
Using the above steps, create the following mappings.
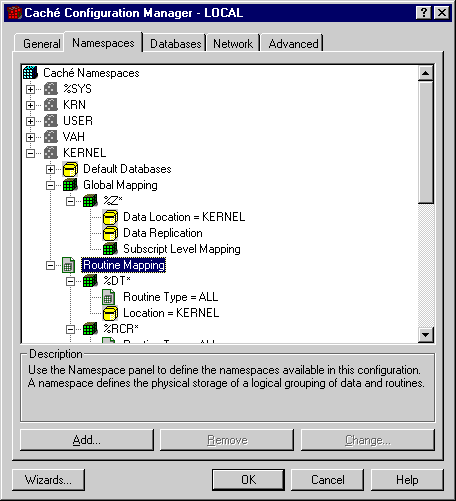
Here is a partial view of the final mappings that show routines and globals are mapped.
|
Search | Home | MUMPS | Fileman | Kernel | C/S, Mailman, Web | Programmer Tools | Applications